After many, many hours of marking, pinning, and cutting, I'm finally making some progress on the dirndl project.
Let's just say that this will be a giant learning experience, as the instructions are full of a long list of things I've never done:
- make something with a lining
- use interfacing
- use a pattern without seam allowances included
- princess seams
- pleats
So, to start off, I decided to be cautious and do something else I've never done before - make a test version!
As usual, the first challenge was figuring out what size to use: (For those of you non-sewers, the pattern comes drawn for several sizes and you cut it out to your size). This part is never fun, as your pattern size usually is a size or two (or three) above the size you wear from a store. Similar to how couture and some designers haven't changed their sizing over the years will have you in a larger size than the other designers who have increased the sizing over the years.
The test version worked out ok, though it did show me this would be much harder than I thought!
And then the not so fun part began....I traced and cut and traced and traced and... For the 6 pattern pieces, I had to mark and cut each one 6 different times! And I ended up doing an extra 2 sets because I'd cut out the lining backwards. So, the bright purple cotton lining is now a blue silky patterned fabric. A much better choice, but frustrating to have to do it all over again.
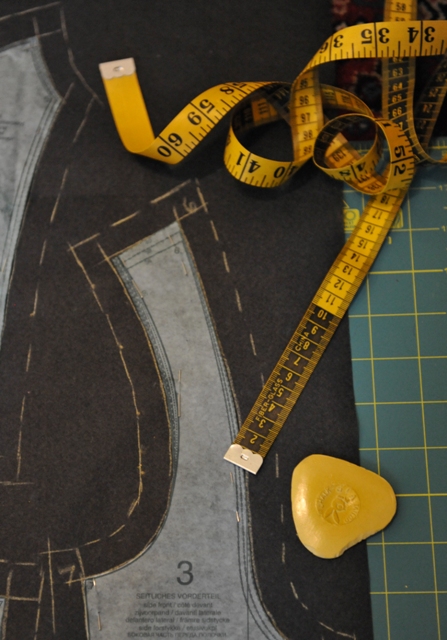
As you see from the top picture, I had to draw 1.5mm seam allowances around everything before cutting it out.
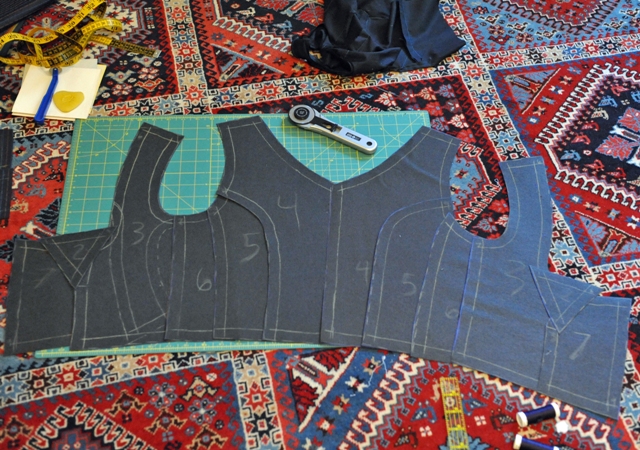
Here we have the outside of the dirndl cut. The skirt parts are cut out too, but I've put those away for now. I think the bodice will be 80% of the work!

After all that cutting, I decided to cheat a little on the lining. Since all of the markings would be on the interfacing (the black material, which irons onto the lining fabric). I just ironed them on to the lining and then cut around it. I couldn't bear the the process of measuring and drawing the seam allowances again!!
;)
I took advantage of having cut out the lining backward and used those pieces as another test. After my first not-so-good attempt, I researched how to sew curves and princess seams. (excellent hint from ThreadsMagazine: cutting notches in the convex one and ironing out the concave one to make it bigger is a HUGE help).
Not bad for a beginner! (though apparently I need a tailor's ham to properly iron out the curve...yet another thing I knew nothing about)
;)
And everything is laid out to start the sewing (lining, interfacing side up)
The funny part is that the actual sewing part takes very little time. It's all the measuring, marking, pinning, and cutting that takes all the time. Oh, and the reading the pattern a thousand times to try to understand what it is saying. I swear, it's tougher to decipher than most legal documents!
So here's the first measurable progress, the bodice lining.
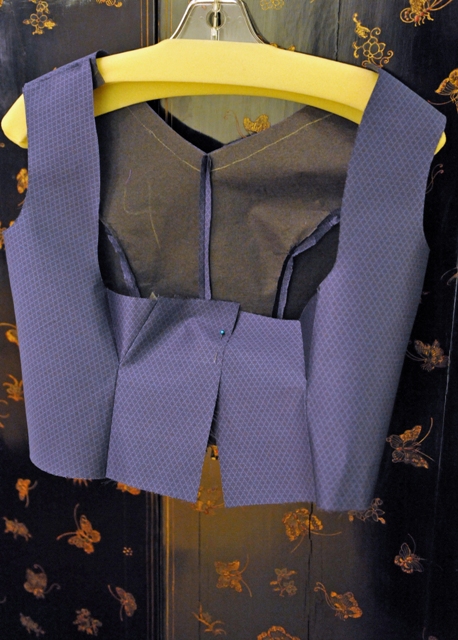
I definitely like this lining better than the first fabric!
Hopefully I'll get some free time to work on the outside this week.